- JavaScript
Google login in Hono JS

Social login is a convenient authentication method that allows users to access an application by using their existing social media credentials, such as Facebook, Google, or Twitter, using the OAuth 2.0 protocol. Integrating social login into applications simplifies the user registration and login process, eliminating the need for users to create a new account and remember additional login credentials.
In this blog post, you’ll discover how to integrate your own Google login without the use of third-party libraries. The guide will walk you through the implementation steps, providing a concise and effective approach to adding this feature to your application. Additionally, there will be an extra bonus at the end of it.
What is OAuth 2.0?
OAuth 2.0 is a widely adopted industry-standard protocol designed to facilitate secure authorization in web and mobile applications. It provides a framework where users can grant limited access to their resources, such as profiles and data, to third-party applications without exposing sensitive credentials. Using tokens like access and refresh tokens, OAuth 2.0 ensures secure communication between users, applications, and service providers, offering a flexible and scalable solution for diverse authentication scenarios.
Its straightforward implementation, compatibility with various platforms, and ability to uphold user privacy make OAuth 2.0 a foundational element in modern online services. As a result, it plays a crucial role in ensuring data protection, user privacy, and a seamless, secure experience across a wide array of digital applications.
Create Hono JS App
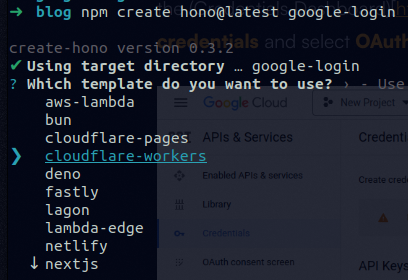
First, we need to set up the project; it will be made to run on Cloudflare Workers. So run:
npm create hono@latest google-loginOn the options, you have to select Cloudflare Workers.
Get Google ID and Secret
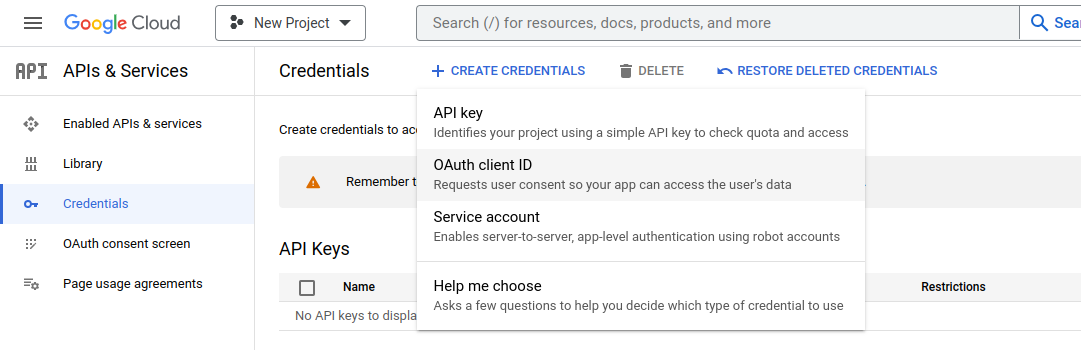
To use OAuth 2.0, you need the ID and Secret of the provider you will work with. For Google, you need an account on Google Cloud Platform and complete some basic configuration of the Consent Screen. Then go to the Credentials Dashboard, click create credentials, and select OAuth client ID.
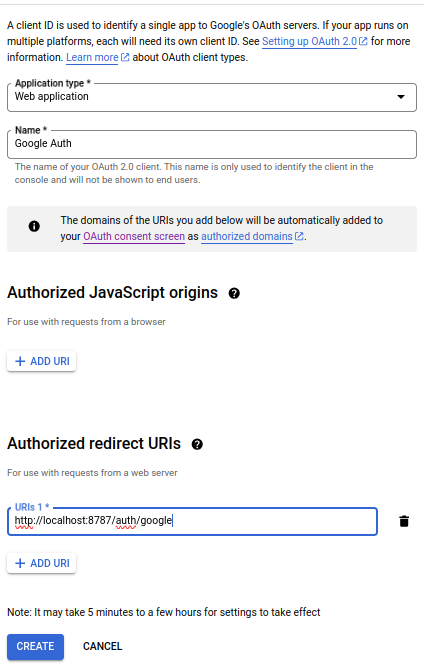
You’ll have to configure the Oauth credentials as follows and press create.
After this procedure you will see your credentials.
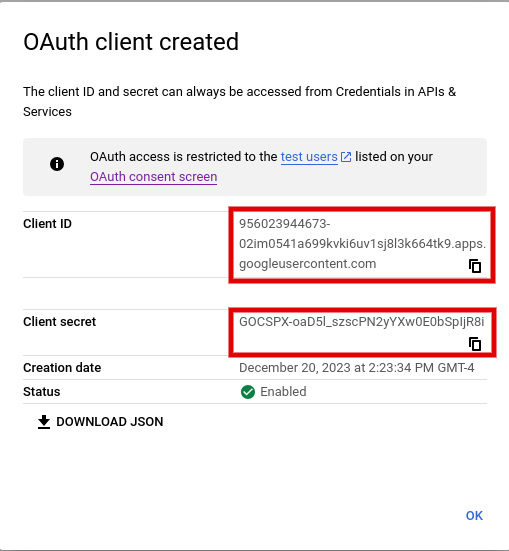
Copy and set them in the wrangler.toml file as follows:
GOOGLE_ID = "956023944673-02im0541a699kvki6uv1sj8l3k664tk9.apps.googleusercontent.com"
GOOGLE_SECRET = "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"
Google Auth Endpoint
In the index.ts file set the endpoint for the authentication with Google. As endpoint we will use the one we set in the Authorized redirect URIs.
app.get("/auth/google", (c) => {});From now on, all the code we make will be within the endpoint we just created.
OAuth 2.0 Follows
To implement authentication with OAuth 2.0, we need to know how this protocol works. With Google, we have 3 “steps”.
1. Redirect to Google Login Screen
The first step is to redirect to the Google login screen with the required configuration. This configuration will vary according to your application needs, but for this example, we will only need the minimum configuration for login.
const parsedOptions = new URLSearchParams({
  response_type: "code",
  redirect_uri: "http://localhost:8787/auth/google",
  client_id: c.env?.GOOGLE_ID as string,
  scope: "openid email profile",
}).toString();

return c.redirect(
  `https://accounts.google.com/o/oauth2/v2/auth?${parsedOptions}`
);- The
response_typewith “code” value is necessary because this application runs on the backend and is the best suited for this. - The
redirect_uriis where Google will redirect the user once the login is successful; it should match the ones you set in Authorized redirect URIs on Google Cloud OAuth Credential Dashboard. client_idis the ID we get from Google.- The
scopeis what information the user will grant access to your application to retrieve from Google; for this scenario, the necessary scopes are “openid”, “email,” and “profile.”
2. Capture Code and Exchange for Token
If the login is successful, Google will redirect the user to the URL set in the previous configuration. This redirect contains a URL parameter named “code.” We need to use the code to exchange it for an access token. There are two ways to proceed with the OAuth 2.0 flow: we can use 2 different endpoints, one for the redirect and the second for the code handling, or we can use 1 single endpoint that handles both. In this example, we will work with only 1 endpoint.
const id = c.env?.GOOGLE_ID;
const secret = c.env?.GOOGLE_SECRET;

if (!id || !secret) {
  throw new HTTPException(401, { message: "Google credentials missing." });
}

const code = c.req.query("code");

if (code) {
  const tokenResponse = (await fetch("https://oauth2.googleapis.com/token", {
    method: "POST",
    headers: {
      "content-type": "application/json",
      accept: "application/json",
    },
    body: JSON.stringify({
      clientId: c.env?.GOOGLE_ID as string,
      clientSecret: c.env?.GOOGLE_SECRET as string,
      redirect_uri: "http://localhost:8787/auth/google",
      grant_type: "authorization_code",
      code,
    }),
  }).then((res) => res.json())) as
    | { access_token: string }
    | { error: string; error_description: string };

  if ("error" in tokenResponse)
    throw new HTTPException(400, { message: tokenResponse.error_description });

  return c.json(tokenResponse);
}- First, we get the id and secret from the environment variables; if one of them is not set, we will return an error.
- Then we get the code from the URL params; if the URL param exists, we will proceed to exchange the code for the token.
- Finally, we exchange the code for the token. For this, we need to send the ID, secret, redirect_uri, the code, and a new field grant_type; this will indicate what operation we are making to the Google API. In this case, exchanging the given code for the access token. Also, we handle an error if there is one.
- If all goes right, you will see some response like this:
{
  "access_token": "ya29...",
  "expires_in": 3600,
  "scope": "https://www.googleapis.com/auth/userinfo.profile https://www.googleapis.com/auth/userinfo.email openid",
  "token_type": "Bearer",
  "id_token": "eyJhbGciOiJSUzI1NiIsImtpZCI6..."
}
3. Use the Access Token
Once we have the Google access token, we can make requests to Google’s API to get the user information your app needs. In this example, we will request the most simple and necessary user info.
const token = tokenResponse.access_token;

// Get user info with access token
const response = (await fetch("https://www.googleapis.com/oauth2/v2/userinfo", {
  headers: {
    authorization: `Bearer ${token}`,
  },
}).then((res) => res.json())) as {} | { error: { message: string } };

if ("error" in response)
  throw new HTTPException(400, { message: response.error?.message });

return c.json(response);- We assign the access token to the variable “token” and then request the user info using it in the authorization header field.
- If all goes well, you will see a similar response to the following:
{
  "id": "519589348677226128",
  "email": "my.email@gmail.com",
  "verified_email": true,
  "name": "Carlos S. Aldazosa",
  "given_name": "Carlos",
  "family_name": "S. Aldazosa",
  "picture": "https://ih1.redbubble.net/image.3504303205.5563/bg,f8f8f8-flat,750x,075,f-pad,750x1000,f8f8f8.u1.jpg",
  "locale": "es-419"
}
All the endpoint will look like this:
import { HTTPException } from "hono/http-exception";

import type { Token } from "../../types";
import { toQueryParams } from "../../utils/objectToQuery";
import type {
  GoogleErrorResponse,
  GoogleTokenResponse,
  GoogleUser,
} from "./types";

type GoogleAuthFlow = {
  client_id: string;
  client_secret: string;
  redirect_uri: string;
  code: string | undefined;
  token: Token | undefined;
  scope: string[];
  state?: string;
  login_hint?: string;
  prompt?: "none" | "consent" | "select_account";
};

export class AuthFlow {
  client_id: string;
  client_secret: string;
  redirect_uri: string;
  code: string | undefined;
  token: Token | undefined;
  scope: string[];
  state: string | undefined;
  login_hint: string | undefined;
  prompt: "none" | "consent" | "select_account" | undefined;
  user: Partial<GoogleUser> | undefined;
  granted_scopes: string[] | undefined;

  constructor({
    client_id,
    client_secret,
    redirect_uri,
    login_hint,
    prompt,
    scope,
    state,
    code,
    token,
  }: GoogleAuthFlow) {
    this.client_id = client_id;
    this.client_secret = client_secret;
    this.redirect_uri = redirect_uri;
    this.login_hint = login_hint;
    this.prompt = prompt;
    this.scope = scope;
    this.state = state;
    this.code = code;
    this.token = token;
    this.user = undefined;
    this.granted_scopes = undefined;

    if (
      this.client_id === undefined ||
      this.client_secret === undefined ||
      this.scope === undefined
    ) {
      throw new HTTPException(400, {
        message:
          "Required parameters were not found. Please provide them to proceed.",
      });
    }
  }

  redirect() {
    const parsedOptions = toQueryParams({
      response_type: "code",
      redirect_uri: this.redirect_uri,
      client_id: this.client_id,
      include_granted_scopes: true,
      scope: this.scope.join(" "),
      state: this.state,
    });
    return `https://accounts.google.com/o/oauth2/v2/auth?${parsedOptions}`;
  }

  async getTokenFromCode() {
    const response = (await fetch("https://oauth2.googleapis.com/token", {
      method: "POST",
      headers: {
        "content-type": "application/json",
        accept: "application/json",
      },
      body: JSON.stringify({
        clientId: this.client_id,
        clientSecret: this.client_secret,
        redirect_uri: this.redirect_uri,
        code: this.code,
        grant_type: "authorization_code",
      }),
    }).then((res) => res.json())) as GoogleTokenResponse | GoogleErrorResponse;

    if ("error" in response)
      throw new HTTPException(400, { message: response.error_description });

    if ("access_token" in response) {
      this.token = {
        token: response.access_token,
        expires_in: response.expires_in,
      };

      this.granted_scopes = response.scope.split(" ");
    }
  }

  async getUserData() {
    await this.getTokenFromCode();

    const response = (await fetch(
      "https://www.googleapis.com/oauth2/v2/userinfo",
      {
        headers: {
          authorization: `Bearer ${this.token?.token}`,
        },
      }
    ).then((res) => res.json())) as GoogleUser | GoogleErrorResponse;

    if ("error" in response)
      throw new HTTPException(400, { message: response.error?.message });

    if ("id" in response) this.user = response;
  }
}
That’s all! Now you can capture this info and create events for new and old users, to register or give them access to your app.
Bonus
The OAuth 2.0 flow we saw in this post is pretty much the same as the ones of Facebook, Twitter, etc. So you can use this knowledge to add many authentication providers to your app. Or you can use the native OAuth Providers middleware from Hono JS. Its usage is pretty straightforward, and you only need to configure a few things.
You will need to set the scopes you require, and you have Google login in your app! (Don’t forget to add your GOOGLE_ID and GOOGLE_SECRET in the wrangler.toml file)
import { googleAuth } from "@hono/oauth-providers/google";

app.get(
  "/auth/google-2",
  googleAuth({
    scope: ["openid", "email", "profile"],
  }),
  async (c) => {
    const token = c.get("token");
    const user = c.get("user-google");
  }
);
Using the native middleware, you can add authentication to your app with just a couple of lines of code. You can add login with Facebook, Twitter, Github, and LinkedIn. To learn more about how it works, read the official documentation.
Conclusion
You learned how to implement your own Google login for your app. This is a powerful tool you can reuse, no matter what framework, library, or programming language you are using. It follows the same concept and flow with every tool you are using. Additionally, you learned about the new OAuth Providers middleware Hono has to offer.
You can check the full code on this repository.
If there is an error in the blog post or you have a question, don’t hesitate to reach me on social media or create an issue in the repository of the blog.